From my kitchen to yours~"It's not in the ingredients, it's in the execution."

Wednesday, July 21, 2010

Chilled Fig and Avocado Soup

Soup is one of my favourite things to create and eat. I first started making my own soups out of necessity because I hate to waste food. It's a great way to use up leftovers or odds and ends in the fridge that would otherwise be on their way out. While this will always be a part of my cooking regimen I prefer to forge a soup from selected ingredients. I pride myself on creating new and interesting soups and this recipe is lacking neither. A perfect prelude to a summer grill.

The Soup
16 small, fresh and ripe figs
1 large, ripe avocado
1 clove garlic, minced
1/2 Spanish onion, chopped
1/4 cup fresh cilantro, chopped
dash each of lime and lemon juice
salt, white pepper and allspice to taste
water or vegetable stock, as needed
olive oil

  • to a heated pot add enough oil to coat the bottom. Caramelize* the onions.
  • add the garlic, figs and season** with salt, pepper and allspice (allspice and white pepper are strong flavours so make sure to start with only a dash or so. You can adjust to taste at the end.) then stir in the cilantro.
  • Add the avocado, lemon and lime juices, and enough water or stock to just cover the ingredients in the pot. Season, then pure. (I find that immersion blenders work best because you can mix right in the pot.) If needed add a little more liquid at a time until the soup has the consistency of a tomato sauce. Season.
  • transfer to a bowl, cover and refrigerate. Adjust the seasonings once the soup is chilled. Flavours change with temperature.
  • Serve into shallow, chilled bowls and top with a generous dollop of pistachio sour cream.
Pistachio Sour Cream
1/2 cup sour cream
1/2 cup pistachios
1 tbsp honey
  • using a blender or mortar and pestle, grind the nuts.
  • stir in sour cream and honey.
  • chill.
*caramelize- the oxidization of sugars in foods during cooking, producing a caramel colour and flavour. To achieve this, cook slowly in a little oil at a medium to low heat stirring scantly and without the use of salt. Salt draws out moisture from foods and can inhibit the sugars from browning.
**season- this refers to the heightening or enhancing of the main ingredients in a dish. Seasonings include herbs and spices and most often salt. Seasoning should not be confused with flavouring which adds another dimension or profile to a dish. Seasoning takes practice and is best achieved if done as you go, building a little at a time. It's always easier to add just a little more then to make adjustments if you've added too much.
Friday, July 16, 2010

Beer and Bacon Mussels

My husband and I love mussels. If it's on the menu we order it. But in my experience mussels are most commonly served in a tomato or white wine based sauce. The following recipe is my deliberate choice to create something different. Enjoy.


1/2lb Mussels
2 slices bacon, lardon (thinly sliced)
1 shallot, brunoise (3mm cubes....aka very small)
1 clove garlic, minced
1 tsp butter
6oz wheat beer
1 orange
  • Rinse mussels, trimming off any beards.
  • Discard any mussels that do not close when tapped. Set aside.
  • In a small sauté pan, render* bacon.
  • Deglaze** the pan with a bit of the beer and set aside.
  • In large shallow Dutch oven, melt butter over medium heat and sweat*** off the shallot and then the garlic. Season with salt and pepper.Squeeze juice from ½ the orange and zest the peel into the pan. Add beer and bring to boil. Add mussels and bacon (including the liquid from deglazing), reduce heat, cover and simmer until mussels open (about 10 minutes). Discard any that do not open. Place the other ½ of the orange in the centre of a bowl and plate the mussels around it.
Serve with a chunk of crusty bread for dipping.

*Render- cooking to reduce the fat content.
**Deglaze- a method of removing cooked particles of food and fat from the bottom of a pot or pan for the purpose of adding flavour to a sauce.
***Sweat- cooking lightly without browning. Using salt helps to promote sweating because it draws out moisture.

Thursday, July 15, 2010

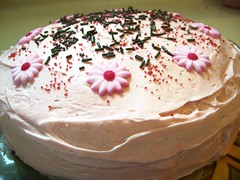
Jello Icing


I came across this recipe a few years back when I was wondering how I might make a flavoured icing for my daughter's birthday cake. I've never been an avid baker because I prefer salty and savoury. Unless it's chocolate, I find icing to be too sweet and without much flavour. So I got to thinking and I wondered if I could use jello to make icing. It would not only offer a long list of flavours but it could colour the icing at the same time. Seeing as my baking library was slim pickin's I decided, like everyone else looking for answers these days, to Google it. After some searching I found a recipe that was exactly what I had imagined. The result is an icing much like a butter cream, but packing a flavour punch. I also think it would make a fantastic topping for cup cakes. Instant pudding mix can also be used, in place of jello, like I once did for a bachelorette party cake. Now that was a memorable cake! Anyhoo, use your imagination and enjoy this recipe.

Ingredients:

1/2 lb butter, softened
2 cups icing sugar
1 pkg jello of desired flavour
1/2 cup boiling water

Method:

Cream butter and sugar together. Dissolve jello in boiling water and let cool (but not to set). Stir in jello liquid a spoonful at a time until desired colour and/or flavour is achieved. Makes enough to cover a 2 layer cake made in standard 9" round cake pan.

Wednesday, July 14, 2010

Loaded Potato Salad

A little while ago I decided to invest in a Canon 20D and brush up on my photography. Seeing as the camera came to me with previous experience I probably should have spent a little more time getting to know it. Blinded by it's beauty I went too far too fast. And now I'm paying for it. Currently I'm trying to figure a way of retrieving the results of my hasty trigger finger, because all of the data was taken as RAW. I barely know what that is myself, but to explain to you better it basically means that the files are too big for my software to handle, or most photo kiosks for that matter. If I had a way to handle it, apparently I could do all kinds of stunning things to my photos. But for now they are stuck on my camera, including the shots of my loaded potato salad.

For the last 2 days I've been lounging on the beach up at Wasaga with a few of my friends and plenty food. We all love to cook so it was quite the feast. Part of my contribution was a potato salad for the baked potato lover.

Loaded Potato Salad
8 large Chef's Potatoes*, peeled and cut into cubes
5 strips of bacon
3 green onions, washed and thinly sliced on the bias
1/2 cup sour cream
1/3 cup mayonnaise
3 tbsp white vinegar
salt and pepper to taste
  • boil potatoes in salted water until al dente** (about 8-10 minutes)
  • drain but do not rinse (rinsing washes away the starch that helps bind the salad and may also break the potatoes)
  • transfer to a stainless steal bowl, sprinkle with vinegar, salt and pepper and place in the freezer to cool. Stir gently every few minutes to help them cool faster, to prevent carry over cooking***.
  • while the potatoes are cooling, cook the bacon. I like to cook my bacon in the oven because it's quicker. Place the strips on a parchment lined pan and bake in at 475F for at least 8 minutes or until very crispy. Remove the excess fat and cut the bacon into very thin strips or bits.
  • Add bacon, onions mayo and sour cream to the cooled potatoes all at once and stir. Taste and season with salt and pepper if needed.
*Chef's potatoes- A Russet or Idaho potato. These potatoes are usually best for mashing or baking but I chose them to use for this dish because I wanted the taste and texture to resemble a loaded baked potato.

**Al dente- when referring to vegetables means tender on the outside and firm on the inside. Cooking potatoes, for salad, beyond this point will mean the potatoes will not hold their desired shape.

***Carry-over cooking- refers to the amount of cooking that occurs in foods after it's been removed from the cooking source. Over cooking can occur in this time because the carry over cooking was not factored into the preparation of the food.

Saturday, July 10, 2010

Phyllo Wrapped Salmon Fillets

Phyllo pastry is an easy way to dress up an endless array of ingredients. Most stuffing requires some cooking before being wrapped because the phyllo only takes about 15 minutes to bake in a 425F oven. Tonight I have chosen salmon, one of my favourite fish, to prepare with phyllo. Seeing as the cooking time for salmon is about the same as the phyllo, I will wrap it raw but marinated.

If you are using frozen phyllo, it must be completely thawed and room temperature before use.

Fish Marinade
1/4 cup lemon juice
1/4 vegetable oil
2 cloves fresh garlic
1/3 cup green onions, minced
1tbsp capers, minced
1/2tsp coarse sea salt
1/2 tsp black pepper
2 bay leaves, crushed
1tsp thyme
  • lay fish in marinade for 20 minutes and flip 1/2 way through, if not submersed.
  • remove and pat dry before laying the fish on the phyllo
Wrapping
2 sheets of phyllo per (5-7oz) fillet
melted butter, as needed
  • lay down 1 sheet of phyllo on a dry flat surface.
  • butter the edges and a small amount across the middle using a basting or pastry brush.
  • lay the 2nd sheet directly on top, smoothing it gently. Phyllo tears very easily but you can repair it using a little of the melted butter as glue.
  • lay the salmon a few inches from the bottom, in the middle of the phyllo. Roll the salmon with the phyllo upwards, careful not to tear as you go.
  • Before the last flip up, fold the ends into the center.
  • Seal the last flip with some more of the butter.
  • Lay on parchment (not wax, it burns) lined pan and bake in a 425F oven for 15-25 minutes, or until the pastry is golden brown.
drape with
Creamy Garlic and Parmesan Sauce
1cup whole milk or light cream (3-5%)
1tbsp butter
1tbsp all purpose, white flour
1/2 cup parmesan cheese
1/2 tsp mustard powder
2 cloves garlic, minced
pinch nutmeg
tsp lemon juice
salt to taste
  • in a small sauce pan, melt butter, add garlic and cook slightly without browning the butter or the garlic.(browing at this stage will mean the sauce won't be white.)
  • stir in the flour and cook another 1/2 minute more
  • using a whisk, add the milk stirring continuously until the sauce begins to thicken.
  • Reduce heat to low and add the cheese, stirring till incorporated
  • add the remaining seasonings and salt to taste
  • serve sauce immediately, over the fish
I enjoyed my dinner with a side of steamed asparagus spears.
*before cooking, asparagus should always have the ends snapped off, or shaved using a peeler, because they are woody.

Thursday, July 8, 2010

Cool Cous Cous Salad

Summer salads: the perfect match for anything BBQ'd. Tonight I'm grilling up my Ribs and to go along side, I pulled together some fresh ingredients I had on hand. The result is a little something to cool the flames.

1 cup cous cous
1 cup water or stock
  • bring liquid to a boil, add cous cous, stir, remove from heat and cover. After 5 minutes, fluff with a fork and refrigerate till cooled.
1/4 cup celery, diced small
1/2 cup cucumber, diced small
1/2 pint cherry tomatoes, sliced in quarters
1/4 cup red onion, diced fine
1 cup chick peas (if canned, drained and rinsed)
1 clove garlic, minced
hand-full fresh dill, chopped
4 tbsp olive oil
1 tsp lemon juice
2 tsp rice vinegar
salt and pepper to taste
  • Once cous cous has cooled add the above ingredients, toss and taste. Adjust seasonings if needed.
Serve on a leaf of lettuce. Try something long and leafy like Red Leaf lettuce or Romaine because it is also firm.
OR
Try stuffing it into half a fresh pepper, cut lengthwise.

~ you're welcome ;o)